|
|
||||
|
Big Time
As of TouchDAW 2.5 the Big Time view is fully editable und user-customizable. Its default appearance replicates most of the previously hardcoded functionality, but is provided as an XML preset and you can change every aspect of it. If you have no need for a large timecode display, you can also load any other preset into this screen.
For details on editing see Custom Controllers. |
||||
|
A large SMPTE timecode or bars'n'beats display along with some 8 channel recording options. This basically mimicks the big time windows available in most DAWs and the simple purpose behind them: keeping an overview on where on the timeline you are.
The timecode displayed here by default is part of the DAW control data received on the app's first MIDI connection. To make the screen display MTC or MIDI Clock received on the second connection, edit the display component's 'MIDI' assignments.
Besides timecode there are some more controls available when touching the screen over, on and underneath the timecode:
Double-taps bring up the menu, single touches at the top and bottom show controls for quick multitrack recording situations.
Touching the timecode display will switch between SMPTE and bars'n'beats display (not available in all DAWs) and you can do horizontal swipes on the timecode to alter its length and refresh rate (see below).
Changing timecode display length
Display of all timecode variants (MCU, HUI and MTC) can be adjusted to show only a reduced set of fields. You can display bars and beats but no ticks or minutes and seconds without hours and frames. To do so perform horizontal swipes on the displayed timecode. Swipe towards the screen border to push a field out (ie: hide it) and towards screen center to pull it back in again (make it visible). This can be done on both start and end of the timecode depending on which half of the screen you're in. TouchDAW will trim the timecode using simple string index operations and at times you may have to pull in on one side before being able to push out on the other, but it should allow for targeted
display of all continous substrings down to the minimum display length, which is 5. Dots, colons etc. count as characters.
Note that the maximum fontsize needs to be limited to avoid OpenGL errors. On large xhdpi tablets (Nexus 10, Kindle HDX) the shortest possible timecode length will not really fill the screen. Poor man's streamer bars The default layout contains two simple streamer bars on top of and underneath the timecode. Streamers are usually drawn over video displays in ADR studios to give speakers an easy visual representation of their take's ellapsed and total time, but they may be useful with just timecode and no video as well.
Other than with most streamer solutions you don't program start and end times with TouchDAW, but simply send it MIDI pitchbend commands on MIDI channels 15 and 16 over the app's second MIDI connection. This allows for easy reprogramming of the streamer by moving around and stretching a MIDI part that contains a continous pitch ramp on a MIDI track in the DAW. You can also do MIDI controlled count-ins etc. with this approach. See the screenshots below for an example. Here the "Count in" part will flash the upper streamer four times before the "Rise" part starts increasing the lower's position over the entire part's duration while the "Fall" part will decrement the upper.
|
||||
|
|
||||
|
Recording Light
As of version 2.2.0 this screen can also act as a recording light or display:
When timecode is running and a MCU / HUI record command is received, timecode will turn red and go back to normal when recording stops. The colors for both states can be changed by editing the display component's properties. If you do not want this functionality at all, set both colors to the same value. You can get record light functionality without timecode by entering text of your choice under 'Title'. Record commands will then toggle the displayed text between the set "Recording Light Color" and a dimmed down gray. In MTC mode the recording light will also act upon the default settings of the "Recording Light" control surface plugin in Logic: MIDI note numbers 24 & 25 (hex 0x18, 0x19) on MIDI Channel 2 received on the second MIDI connection will change the color. 
|
||||
|
MIDI Timecode (MTC) and MIDI Clock display
To enable MTC or MIDI Clock display, edit the Timecode control's MIDI settings: Use the 'Sysex / Custom' entry and either type in the status byte (F1 for MTC, F8 for MIDI Clock) directly or pick from the list available when touching the 'Sysex' label.
If MIDI timecode display is enabled, the screen will show MTC or MIDI Clock received on the app's second MIDI connection. Recording and transport controls remain active, but Mackie or HUI timecode will no longer be shown. 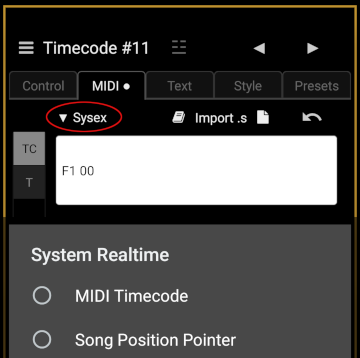
The SMPTE type of incoming MIDI timecode is shown with the colons seperating hours, minutes, seconds and frames:
24 fps: all single colons (10.20.30.40) 25 fps: double-colon before frames field; (10.20.30:40) 29.97 non-drop: all double-colons (10:20:30:40) 29.97 drop: double-colons and a semi-colon before the frames field (10:20:30;40) For correct bar and beat numbers when displaying MIDI Clock the app needs to also receive Song Position Pointers. |
||||
|
Display style 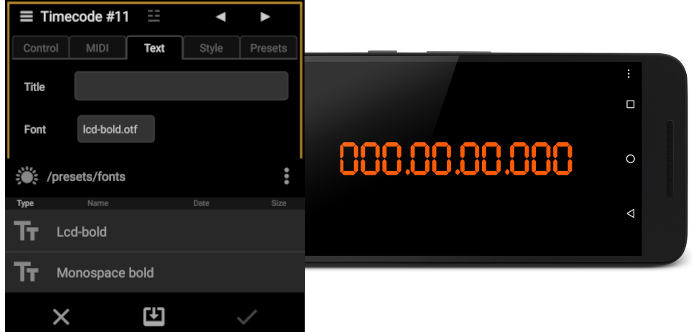 |
||||
|
Timecode can be displayed using any open- or truetype (.otf, .ttf) font that you can make available and any color you prefer. To change the font, select the timecode display for editing and choose a typeface on the 'Text' tab. 'Font' options by default only contain fonts guaranteed to be available on all systems, but you can import font files from Drive folders or the local filesystem. Regular and recording colors can be set on the 'Style' tab. |
||||
|
Need it larger? |
||||
|
This is TouchDAW running on a cheap (and nicely small) HDMI stick packaged Android "Media Center PC". |
||||
|
|
||||